Sunday, September 16, 2012

Basement: Before and After (It’s been a doozy of a journey)!

I’m sure you’re wondering how on earth I could find any more to tell you, or even maybe catch your attention with, in relation to the basement.  Well, I think you will be surprised when you get a peek at some of the before and during basement pictures.
Let's start at the beginning....

Once upon a time, about three years ago, my husband and I were newly engaged and ready to buy our first home.  We started looking in a quaint area that features mostly older houses, specifically Cape Cods.  One of the criteria for our purchase was to find a house that already had a finished basement or would have the ability to do so in the future.  Unfortunately, there weren’t many contenders due to leaky basements and other foundation issues (this area is a little more prone to it), but we found a few contenders!  One of which, eventually became our home.  You’ll see in the before pictures that it definitely needed a little TLC, but we thought we could re-use what was already there.
 
We added the basement access from the dining room; prior to this you had to go through the kitchen.
 
Not great, but not terrible.
 
Fast forward a few months and we began discover that our house had some foundation issues as well.  One morning, this came to a head.  My husband and I were both traveling for work and we found that our basement drain backed up into the finished part.  However, it was 6:30am and we both had flights to catch, so we had to leave it.  The mold and musty smell we came home to was horrible, and quickly became an issue for allergies.  We ripped out the previously finished basement and began the water proofing process.
 
As you can see by the carpet, the water issues have begun; and it got a whole lot worse!
We were too invested in our house to sell at this point, so we decided to take an aggressive approach to our water problem.  We did the following to waterproof our basement:
  • Repair/re-route the sump pump (internal and external)
  • Foundation wrap (external)
  • New window wells (external)
  • Additional braces/support for the basement (internal)
  • Install proper drain tile (internal)

Right around here, is where I think our neighbors thought we were crazy.

Back view of our house.

After we tore the finished portion out, the foundation company used a jack hammer to go around the edge of the foundation on the inside.  If you've never experienced this, it is i-n-c-r-e-d-i-b-i-l-y dusty!
 
After proper drainage was installed, they filled it back in with concrete.

It took a LOT of concrete (and a cement mixer in our basement) to fill it in.
After looking at the yellowish/greenish foundation walls for awhile, we decided it was time to paint.  To make it less of an eye sore and further seal the foundation, we used a white elastomeric paint.  Then, the floor was painted with gray patio/concrete paint.  It really helped to clean things up while we waited and saved for the basement finishing project!


Lastly, before we began finishing, we applied fiberglass sheeting, which bumps up against the internal drain tile.  If water would ever get in (I cringe even typing that), it will remain behind this and go directly into the drain tile, rather than molding the drywall.
This then brings you to where some of my early blogs began.  As you can see, it took us awhile to get to where we are today, but we now feel like it was worth it.  I’m moving on to our next room (our office) and my husband is leading the charge in adding final touches and sports memorabilia to the walls; after all, this is man-land! 
I hope you’ve enjoyed hearing about our "little project”.  J

Wednesday, September 12, 2012

A Means to an End; an End Table That Is…

As we started to use the basement we quickly realized we had a little dilemma; where do we put our beverages when we watch movies?  After a long week at work, I’m sure you’d agree this is a pretty big dilemma!

There’s two ways we found ourselves working around this.  Option 1; put your drink in the cup holders on the poker table.  It’s not a terribly far distance from the sectional, but it’s far enough you have to get up to get your drink.  Option 2; put your drink on the carpet.  The frieze we selected is fairly fluffy so depending on the drink, we may have some stability issues with this option.  Also, I have some clumsy tendencies, particularly with spilling things, so this seemed like I was tempting circumstances.  Based on this, we decided it was time for some end tables!


I knew I wanted something round, to balance out the square/rectangular edges we already have in our other furniture.  When we were shopping for our sub woofer, I wandered off and ended up in a small section of decorative items.  It included jars, end tables, trays, signs…basically all the little touches you would want to grab right on your way to the checkout line.  In this section, they had two silver, hammered drums.  I will admit I regret not having grabbed those two on the way out that night; they were adorable and would have been perfect!  But, we were working within our budget and timeline for basement purchases. 

Fast forward about 3 months and it was time to shop for end tables.  I did go back to try to find the silver drums, but they had all been sold out.  I did however; find a slightly smaller version with a more open body.  Unfortunately they only had one, but I knew this one was coming home with me!


I also ended up finding another round end table, with a silver textured top and rusted iron legs.  I know these don’t technically “match” but I actually like that.  
My basement efforts are coming to a close and I’ll be moving on to the next room, but I do want to share one final blog about this space and the journey it’s gone through from start to finish!  Tune in next week for details. 


Sunday, September 9, 2012

Feathers+Fabric=Fabulous!

First and foremost, I must apologize for my significant delay between blogs!  My “day job” is keeping me a little busier than I’d like…but whose doesn’t?  I’m sure you can relate.  :)


So where did we leave off?  Pillows!  Right now, the options for gray pillows are amazing!  

My first stop was Crate and Barrel.  I fell in love with an over-sized gray and ivory striped pillow, Olin Grey Pillow.  I admit that when I made this purchase, I was aware that it was probably too big, but I bought it in the hopes that it would work.  I also grabbed a few other gray pillows that complimented it.  Unfortunately, l should have just stuck with my instincts; I put it in the corner of the sectional and the scale was off.  So, it had to go back!

(Excuse the image quality on this one, I took it with my old cell phone)
The next option was pillows in various textures and shades of gray.  I really liked some of them, but it seemed a little…boring.  

At this point I turned to a local, designer store for inspiration; they have all sorts of wonderful furniture and accessories!  I quickly learned that while some things are affordable (we purchased our china cabinet from there) their pillows are not quite in my budget (starting at $150/pillow).  Of course, while I was there I did manage to find a pair of pillows (and fabric) I became obsessed with; a blue/gray geometric pattern.  I became so obsessed that I even made a few trips to the store to stare at them in admiration.  However, I would never allow myself to buy them (I’m not sure why I felt the need to torture myself).

Eventually, I went back online and searched all the usual options; Pottery Barn, Z Gallerie, Crate and Barrel, West Elm, and Restoration Hardware.  All had lovely options, but nothing that quite fit what I was looking for.  Then, I randomly decided to try something different and searched Etsy.  JACKPOT!  There were all sorts of great options in the EXACT fabrics I had found at the designer store, but much more budget friendly ($30-40/pillow cover).  It took a little time for them to arrive (maybe 2 weeks) but it was worth the wait. 


The final product is an assortment of the original Crate and Barrel pillows, the Etsy purchases, and some sale items from West Elm.  Lastly, I stuffed these with some Pottery Barn inserts (they’re my favorite) and we were in business!  

What do you think?

Still working on my picture quality and flash settings...

They needed a little something too!

Monday, May 28, 2012

Fast Forward: We Have Furniture!

We’ve been busy bees shopping for furniture for the basement!  It took a little time to find what we were looking for and to have it delivered (granted, we did have some particular criteria), but it was worth the effort and the wait! 

Our furniture requirements were:
  • Functional-We wanted more seating in this space.  Most of the “community rooms” in our home are fairly small in scale, so it can get pretty tight when we have family and friends over.  More seating was a must so we decided a sectional was in order!  Additionally, we wanted leather to make it more durable. 
  • Proportionate-This was a big one for me; I really wanted furniture that fit into the room properly and created an inviting feeling, rather than a sense of claustrophobia.  This proved to be quite the challenge!  Have you found that a lot of the furniture out there is just HUGE?  I know we were looking for a sectional, but I still found the furniture dimensions baffling.  Based on this, we spent a lot of time measuring, not only for the sectional, but also for the entertainment center, bar, and ottoman.
  • Storage-We didn’t quite find everything we wanted in this space, but we did pretty good overall.  At one point we looked into building a custom entertainment center, but the cost to have it done was quite hefty and it would have been a bit trickier to DIY due to the sloping floor.  We opted for a nice entertainment center that hides the bulk of the electronic units/cords.

We also re-purposed a few items.  The armless chairs were previously in our “Man Heaven”, the table the poker top is resting on top of was one of my first furniture purchases, and the mini fridge and other bar essentials were my husband’s.  We’re still shifting a few things around, but we’re really happy with how everything came together.  We’ve tested out the space for movie watching and we love, love, LOVE it!

Now, it’s just the finishing touches, my favorite!  Next week…pillow talk. 

Seating for 5, yes please!
Another view
Bar
Behind the bar
Re-purposed items


Sunday, May 20, 2012

Wanted: Pocket Wall Sconces

I’ve been a bit tardy in blogging a new post; whoops!  I’ve added this to my list of things to get better at, along with my overall blogging skills.  If you have tips/tricks or resources you would recommend to learn more about blogs, feel free to send those my way!  I have a lot to learn.

Now, onto the basement updates.  Do you ever find that the part of the project that should be easy tends to be most difficult?  If yes, then you will be able to relate to my lighting dilemma!

One part of our basement project was to dry wall the stairwell leading to the basement.  This was previously finished and had a quirky lighting situation, where in the wood paneling on the stairwell, there was a transparent plastic square that had a light behind it.  While I definitely understood the practical aspect of this, it really was an eyesore (not the best picture, but it gives the idea).  
Old stairwell lighting
We absolutely wanted to avoid replicating anything like that, so we had the electrician put a wall light in at the top of the stairs.   Something to know about our house is we live in a cape cod, so the stairwell to our basement is also directly below the stairwell going up; this eliminated any ceiling lighting options for the basement stairs. 
 
But as I mentioned, we had a good solution and I began the process of finding an attractive pocket wall sconce that would fit in the space we had; we could fit something 8-9 inches in height with a depth no more than 4 inches.  Sounds easy enough, right?  

My first stop on my lighting search was of course our local Lowes, and then Home Depot.  Most of the options I found were fairly large in size, or had a very modern feel to them, which doesn’t quite go with the décor of our home.  Also, something else that I noticed is that amber toned glass/light fixtures seem to be making a comeback. I tried to keep an open mind, but when I looked at them I kept getting an urge to clean.  Quirky I know, but they just feel so dingy to me!

I searched stores in town, as well as online, and found one contender (literally).  I dig the vintage light bulb and thought it added a nice touch to the stairwell!  The fixture is a little small, so we framed it to hide the electrical wall components (the round thing-ie that hold the fuses); just needed some spray paint and quarter round for this!

Whew, I know that was a lot of information, but this little sconce sure was hard to find.  Coming next, furniture!  

Our little sconce
Close up view


Sunday, April 22, 2012

Carpet Angels!


Yes, you read that right, carpet angels (almost as fun as snow angels)!  I have decided that lying on the floor on our newly laid carpet, and making angels, is AMAZING!  I actually haven’t lived somewhere with carpet in quite some time and never a frieze; it is so soft!  

Family Room-After Carpet
We have carpet in our family room on the main level and our newly finished basement.  The family room carpet, pre-frieze, I must say was in quite a sad state.  When we first moved in it was on our list to replace asap, that is, until we started our actual remodeling projects and found out how much everything cost.  (Side note:  We also looked at beautiful stainless steel appliances which probably won’t be in our home for another 5 years, if ever!)  Oh how naive we were as first time homeowners!  Fast forward 2.5 years and we are finally replacing that stained and rather nasty carpet.  In fairness to the previous home owners, during our renovation stage of the house, we used that room as our storage room and were not the most mindful of protecting the carpet, so a few stains may have been added along the way.  Here's a couple of after pictures with the new carpet; MUCH better!
Family Room-After Carpet

 
Shopping for carpet was a rather interesting experience; we looked at Lowes, Nebraska Furniture Mart, and a smaller carpet store.  Unlike the other projects we’ve done, everyone came in right around the same price point and same time-frame for installation.  Who knew it takes nearly 3 weeks for the carpet! 

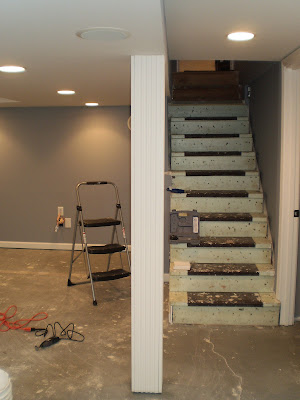
Overall, we are very pleased with it, but as the true perfectionists we are, we will admit that there are two things we might have done differently.  First, the frieze does show foot traffic and gets a little matted, so it might have been a good idea to do something slightly more durable on the stairs to the basement.  Second, we did a small section of vinyl in a faux wood finish for the bar area.  In hindsight, we wish we would have extended that into the area at the foot of the stairs and straight forward, almost like a hallway.

Live and learn, right?  Right.  

Either way, it’s a big improvement from what we previously had!  

Please follow Taylor Made Haven if you want to read more about our home adventures!  Enjoy your Sunday evening friends.


Basement-After Carpet
The TV found its way down there...more to come on that!
Bar area to the left.
Closer view of the faux wood vinyl.


Sunday, April 15, 2012

From Round, to Square; Ahh Complete!


I’m sure many of you have metal pillars in your basements, particularly if it’s an unfinished basement.  Actually, yes, of course you do otherwise you’re home may just topple over!  While these pillars are a very functional aspect of a home, most of us want to minimize their presence in finished spaces.  When we bought the house and the basement was semi-finished, the pillar was painted.  But, that didn’t do much to hide the rust bubbles and dents, so we decided we’d buy one of those pillar kits at Lowes.

Fast forward a few months.  We now have new drywall, fresh paint, and it’s time to put that pillar on! 
After staring at the kit for awhile, and seeing that the top and bottom molding/rings don’t come apart, we decided we didn’t know how you put this on when your project is not new construction.  If any of you know, please do let us know how you went about this.  We’d love to know!

Based on this we scraped, primed, and painted the pillar in the hopes we could make it “just blend in”.  But, being that it’s one of the first things you see when you come down the stairs, it just wasn’t working for me.  So, to Lowes we went where we found some molding (5 ½ x 7.5) that we used to box the pillar in.  

Here’s how we did it:
  • First, we secured a piece of wood to the floor and the ceiling (the first plank of molding needed something to lean against).
  • Then, we connected second plank and matched the corners so it was flush from both sides.  As I held it, my husband used the nail gun.  One of the hardest aspects was holding it in place while he nailed it together.  This definitely is a two person job and requires a little patience…
  • We attached the third plank and noticed that the pillar felt a little flimsy at the top and bottom.  We decided to use some spray foam to add a little more substance between the planks to allow for more stability.  Then, we attached the fourth plank.
  • Lastly, we filled the nail holes, caulked the gaps, and painted it white.
We now have a pretty, finished pillar as you walk down our stairs; this little project really added a nice, finishing touch.  I love how it turned out!

Hope you all have enjoyed your weekend, it's nearly over, so I'm shutting down the laptop for the night.  Please follow my blog to hear more about our basement renovation!

Just after we installed the wood blocks to the ceiling and floor.
All the molding is nailed together.


Filling nail holes.
Final version.