Monday, May 28, 2012

Fast Forward: We Have Furniture!

We’ve been busy bees shopping for furniture for the basement!  It took a little time to find what we were looking for and to have it delivered (granted, we did have some particular criteria), but it was worth the effort and the wait! 

Our furniture requirements were:
  • Functional-We wanted more seating in this space.  Most of the “community rooms” in our home are fairly small in scale, so it can get pretty tight when we have family and friends over.  More seating was a must so we decided a sectional was in order!  Additionally, we wanted leather to make it more durable. 
  • Proportionate-This was a big one for me; I really wanted furniture that fit into the room properly and created an inviting feeling, rather than a sense of claustrophobia.  This proved to be quite the challenge!  Have you found that a lot of the furniture out there is just HUGE?  I know we were looking for a sectional, but I still found the furniture dimensions baffling.  Based on this, we spent a lot of time measuring, not only for the sectional, but also for the entertainment center, bar, and ottoman.
  • Storage-We didn’t quite find everything we wanted in this space, but we did pretty good overall.  At one point we looked into building a custom entertainment center, but the cost to have it done was quite hefty and it would have been a bit trickier to DIY due to the sloping floor.  We opted for a nice entertainment center that hides the bulk of the electronic units/cords.

We also re-purposed a few items.  The armless chairs were previously in our “Man Heaven”, the table the poker top is resting on top of was one of my first furniture purchases, and the mini fridge and other bar essentials were my husband’s.  We’re still shifting a few things around, but we’re really happy with how everything came together.  We’ve tested out the space for movie watching and we love, love, LOVE it!

Now, it’s just the finishing touches, my favorite!  Next week…pillow talk. 

Seating for 5, yes please!
Another view
Bar
Behind the bar
Re-purposed items


Sunday, May 20, 2012

Wanted: Pocket Wall Sconces

I’ve been a bit tardy in blogging a new post; whoops!  I’ve added this to my list of things to get better at, along with my overall blogging skills.  If you have tips/tricks or resources you would recommend to learn more about blogs, feel free to send those my way!  I have a lot to learn.

Now, onto the basement updates.  Do you ever find that the part of the project that should be easy tends to be most difficult?  If yes, then you will be able to relate to my lighting dilemma!

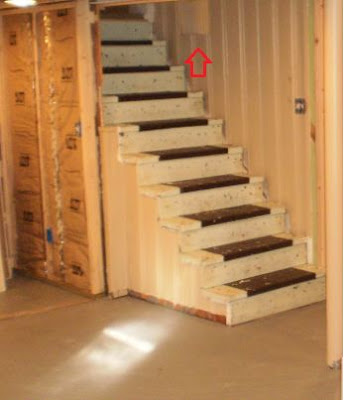
One part of our basement project was to dry wall the stairwell leading to the basement.  This was previously finished and had a quirky lighting situation, where in the wood paneling on the stairwell, there was a transparent plastic square that had a light behind it.  While I definitely understood the practical aspect of this, it really was an eyesore (not the best picture, but it gives the idea).  
Old stairwell lighting
We absolutely wanted to avoid replicating anything like that, so we had the electrician put a wall light in at the top of the stairs.   Something to know about our house is we live in a cape cod, so the stairwell to our basement is also directly below the stairwell going up; this eliminated any ceiling lighting options for the basement stairs. 
 
But as I mentioned, we had a good solution and I began the process of finding an attractive pocket wall sconce that would fit in the space we had; we could fit something 8-9 inches in height with a depth no more than 4 inches.  Sounds easy enough, right?  

My first stop on my lighting search was of course our local Lowes, and then Home Depot.  Most of the options I found were fairly large in size, or had a very modern feel to them, which doesn’t quite go with the décor of our home.  Also, something else that I noticed is that amber toned glass/light fixtures seem to be making a comeback. I tried to keep an open mind, but when I looked at them I kept getting an urge to clean.  Quirky I know, but they just feel so dingy to me!

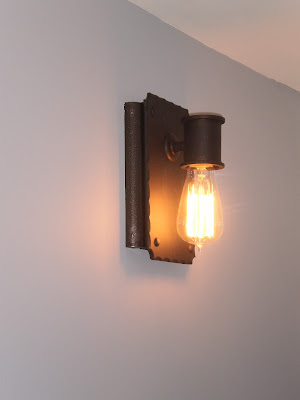
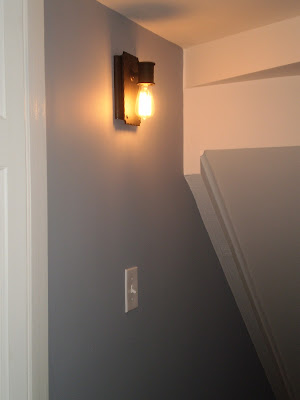
I searched stores in town, as well as online, and found one contender (literally).  I dig the vintage light bulb and thought it added a nice touch to the stairwell!  The fixture is a little small, so we framed it to hide the electrical wall components (the round thing-ie that hold the fuses); just needed some spray paint and quarter round for this!

Whew, I know that was a lot of information, but this little sconce sure was hard to find.  Coming next, furniture!  
Our little sconce
Close up view


Sunday, April 22, 2012

Carpet Angels!


Yes, you read that right, carpet angels (almost as fun as snow angels)!  I have decided that lying on the floor on our newly laid carpet, and making angels, is AMAZING!  I actually haven’t lived somewhere with carpet in quite some time and never a frieze; it is so soft!  

Family Room-After Carpet
We have carpet in our family room on the main level and our newly finished basement.  The family room carpet, pre-frieze, I must say was in quite a sad state.  When we first moved in it was on our list to replace asap, that is, until we started our actual remodeling projects and found out how much everything cost.  (Side note:  We also looked at beautiful stainless steel appliances which probably won’t be in our home for another 5 years, if ever!)  Oh how naive we were as first time homeowners!  Fast forward 2.5 years and we are finally replacing that stained and rather nasty carpet.  In fairness to the previous home owners, during our renovation stage of the house, we used that room as our storage room and were not the most mindful of protecting the carpet, so a few stains may have been added along the way.  Here's a couple of after pictures with the new carpet; MUCH better!
Family Room-After Carpet

 
Shopping for carpet was a rather interesting experience; we looked at Lowes, Nebraska Furniture Mart, and a smaller carpet store.  Unlike the other projects we’ve done, everyone came in right around the same price point and same time-frame for installation.  Who knew it takes nearly 3 weeks for the carpet! 

Overall, we are very pleased with it, but as the true perfectionists we are, we will admit that there are two things we might have done differently.  First, the frieze does show foot traffic and gets a little matted, so it might have been a good idea to do something slightly more durable on the stairs to the basement.  Second, we did a small section of vinyl in a faux wood finish for the bar area.  In hindsight, we wish we would have extended that into the area at the foot of the stairs and straight forward, almost like a hallway.

Live and learn, right?  Right.  

Either way, it’s a big improvement from what we previously had!  

Please follow Taylor Made Haven if you want to read more about our home adventures!  Enjoy your Sunday evening friends.


Basement-After Carpet
The TV found its way down there...more to come on that!
Bar area to the left.
Closer view of the faux wood vinyl.


Sunday, April 15, 2012

From Round, to Square; Ahh Complete!


I’m sure many of you have metal pillars in your basements, particularly if it’s an unfinished basement.  Actually, yes, of course you do otherwise you’re home may just topple over!  While these pillars are a very functional aspect of a home, most of us want to minimize their presence in finished spaces.  When we bought the house and the basement was semi-finished, the pillar was painted.  But, that didn’t do much to hide the rust bubbles and dents, so we decided we’d buy one of those pillar kits at Lowes.

Fast forward a few months.  We now have new drywall, fresh paint, and it’s time to put that pillar on! 
After staring at the kit for awhile, and seeing that the top and bottom molding/rings don’t come apart, we decided we didn’t know how you put this on when your project is not new construction.  If any of you know, please do let us know how you went about this.  We’d love to know!

Based on this we scraped, primed, and painted the pillar in the hopes we could make it “just blend in”.  But, being that it’s one of the first things you see when you come down the stairs, it just wasn’t working for me.  So, to Lowes we went where we found some molding (5 ½ x 7.5) that we used to box the pillar in.  

Here’s how we did it:
  • First, we secured a piece of wood to the floor and the ceiling (the first plank of molding needed something to lean against).
  • Then, we connected second plank and matched the corners so it was flush from both sides.  As I held it, my husband used the nail gun.  One of the hardest aspects was holding it in place while he nailed it together.  This definitely is a two person job and requires a little patience…
  • We attached the third plank and noticed that the pillar felt a little flimsy at the top and bottom.  We decided to use some spray foam to add a little more substance between the planks to allow for more stability.  Then, we attached the fourth plank.
  • Lastly, we filled the nail holes, caulked the gaps, and painted it white.
We now have a pretty, finished pillar as you walk down our stairs; this little project really added a nice, finishing touch.  I love how it turned out!

Hope you all have enjoyed your weekend, it's nearly over, so I'm shutting down the laptop for the night.  Please follow my blog to hear more about our basement renovation!

Just after we installed the wood blocks to the ceiling and floor.
All the molding is nailed together.


Filling nail holes.
Final version.


Sunday, April 1, 2012

Shades of gray (literally)!


I have always heard that grays and creams are some of the hardest paint colors to pick.  I’ve decided I might just concur with that!  Actually, I had some pretty specific criteria in mind when I first decided that a shade of gray was in order, but the most important was that it needed to go with my husband’s collegiate colors; K-State purple.  I know I may sound a little nutty when I say this, but after seeing this purple against one of the neutrals shades of paint we have in our home, in my husband’s temporary “man heaven”, I decided that we had to do much better in our basement.

Temporary Man Heaven
The pennant gives you a little idea of the purple on our tan/neutral...

I specifically was hoping for a blue-silver-gray color, one that would read in a way that didn’t feel too…sterile (as gray’s so often can).  I landed on three potential candidates from Benjamin Moore.
Gull Wing Gray
Shadow Gray
Fusion

Fusion does read more brown than blue-gray, but I did (and do) love it.  Ultimately, I ruled it out because of how similar it was to the color in our upstairs living room (Sherwin Williams-Portabella).  Besides, a gal needs to branch out now and then, right?  

Right!  Maybe.  Can I sleep on it?

After BT (my great husband) and I finished painting the basement, I took a long pause and tried to keep myself from panicking that I had chosen the wrong color.  When the paint was wet, there were moments where I swear it read as periwinkle.  I don’t like periwinkle, in fact, I absolutely hate periwinkle!

After a night of running up and down the stairs and obsessively staring at our walls, I’m happy to report that our walls are not periwinkle!  In fact, it’s actually a really pretty shade of blue-silver-gray and it passed the K-State purple test with flying colors.  It also pops nicely with the white trim and doors.

It must have been those gray, cement floors throwing me off.  Or, too many paint fumes…but either way, Shadow Gray is here to stay!

Enjoy the rest of this beautiful weekend; it's gorgeous outside!  In fact, I might go look at some flowers for our outside planters...
Stairwell to the basement
This will become the TV wall; placeholders for speakers!
Left corner will become a bar area
Pardon our mess; freshly painted baseboards!


Saturday, March 31, 2012

Basement Beginnings


And then there was white…and maybe a few test colors...


For those of you who have had the pleasure of starting a home project from scratch, you know how exciting it can be.  We started refinishing our basement this past November and will be finishing it up this spring.  I am admittedly behind in starting this blog, but I promise to catch you up on where this all started and to provide a few visual flashbacks along the way.  

First and foremost, I must give props (MAD props) to my husband for all his hard work to get our basement to a place where there’s anything for me to blog about!  He has spent countless hours planning, measuring, cutting, and framing our basement; thank you so much for all you do!  I am one lucky lady… 

So, where are we now?  We decided to leave the electrical and drywall to the pros, both of which have finished their work, with overall happy clients.  Now that both of these important steps are done, it’s time for my role in this project to pick up…it’s time for paint!  But first, we needed to prime (and prime, and prime, and prime).  We now have a white wonderland in our basement, well, white with a few color tests of gray on various walls. 


New Drywall:  Before Priming


New Drywall:  Post Priming


I hope you’ve found this a fun read!  Please tune in for the next blog to hear which gray was the lucky winner. 

Hope you all are having a fabulous weekend!

Welcome to Taylor Made Haven!


I’ve thought about starting a blog for quite some time, and I finally decided to take the plunge!  The focus of my blog is the journey my husband and I have taken to transform our house into a home that reflects who we are.  For me, home décor is an escape from my “day job” as a project manager.  I work in IT, which some days, leaves me looking for a creative outlet!  I like to mix it up, try new things, and hope to learn a few things along the way!

I will admit that I may be about two years late in starting this blog, which I will catch you up on our efforts to date, but I figured it was better late than never.  A big thanks to our friends and family for helping us get this far in our journey; we appreciate your support more than you can know!

I hope you have as much fun reading, as I do writing this blog.  Thank you for stopping by!  You can contact me at taylormadehaven@gmail.com.